A GitHub App built with Probot that allows Pull Request authors to self-approve their Pull Requests.
Special thanks to dkhmelenko/autoapproval for providing some inspiration and also some code implementation for this App.
For some repositories, the Pull Request have to be approved before it can be merged.
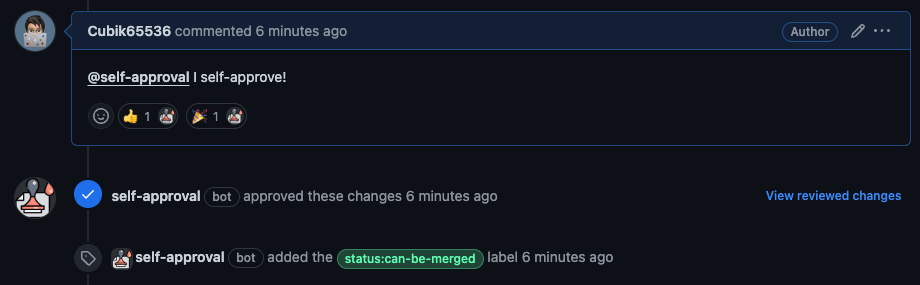
This GitHub App allows some whitelisted repository maintainers to self-approve their Pull Requests, so they can directly approve and merge their own Pull Requests.
Install dependencies
npm install
Build the project
npm run build
Start the server
npm start
Follow the instructions to register a new GitHub app.
Configure the app in the .env file by following the following instructions
.env.example file to .envAPP_ID: the ID of the app, which you can get from the app settings page.GITHUB_CLIENT_ID: the Client ID of the app, which you can get from the app settings page.GITHUB_CLIENT_SECRET: the Client Secret of the app, which you can generate and get from the app settings page.WEBHOOK_SECRET: the Webhook Secret that you generated when you created the app.PRIVATE_KEY: the contents of the private key you downloaded after creating the app.PORT to the port you want the app to listen to.WEBHOOK_URL you configured in the .env file.If you want to update the app that is deployed on your server, you can follow the following steps:
This app can be continuously deployed to Vercel using the Vercel GitHub app.
APP_ID: the ID of the app, which you can get from the app settings page.GITHUB_CLIENT_ID: the Client ID of the app, which you can get from the app settings page.GITHUB_CLIENT_SECRET: the Client Secret of the app, which you can generate and get from the app settings page.WEBHOOK_SECRET: the Webhook Secret that you generated when you created the app.PRIVATE_KEY: the contents of the private key you downloaded after creating the app.https://<your-vercel-app-url>/api/github/webhooks.If you want to update the app that is deployed on Vercel, you can follow the following steps:
Git Repository button to go the the GitHub repositoryGit Repository button to go the the GitHub repository/api folder. Make sure your functions are placed there and double check Vercel detected your Lambda Functions during the deployment process by checking the logs:
The api/github/webhooks/index.ts file is handling requests to POST /api/github/webhooks, so make sure to configure your GitHub App registration's webhook URL accordingly.
In order to use the bot, the config file should be provided. Config file should be defined in your repository. Config file is the yml file with the path .github/self-approval-pull-request.yml. And the file should have these 3 entries: self_approval_comments, from_author and apply_labels.
Define the list of comments that will be considered as self-approval.
self_approval_messages:
  - "I self-approve!"
- "I self-certify!"Define the list of GitHub users who can self-approve their Pull Request.
from_author:
  - "Cubik65536"
  - "<GitHub ID of other project maintainer>"
Assign an empty array if you want everyone can self-approve their Pull Requests (example: from_author: []).
Defines the list of labels on PR, which should be added once PR was approved. For example:
apply_labels:
  - "can-be-merged"
  - "self-approved"
Assign an empty array if no labels should be applied to PRs (example: apply_labels: []).
ISC © 2022-2024 iXOR Technology & Cubik65536